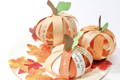
DIY Pumpkin Centerpiece
OCTOBER 25TH, 2022

Does the word “pumpkin,” make you think of Halloween, fall, or maybe pumpkin pie? After making today’s craft, you’ll probably be thinking about how awesome your family is every time you see your pumpkin centerpiece. We love this fall-themed craft because it’s simple, fun to make, and encourages girls to think about their friends, family members, and role models.
Pumpkin Centerpiece Supplies

- Cardstock or construction paper
- Ruler
- Scissors
- Hot glue gun, if using cardstock
- Glue stick, if using construction paper
- Metallic marker
How to Make Your Pumpkin Centerpiece
Step 1: Use a pencil and ruler to make marks on the orange cardstock (or construction paper) that are 1 inch apart.

Step 2: Cut the orange cardstock into 6 strips that are each about 1 inch wide.
Step 3: Put glue in the center of one strip and lay it vertically. Lay another strip horizontally, and press firmly so the strips are well attached in a cross shape.

Step 4: Add two more strips diagonally by placing glue in the center. Then add the final two strips diagonally so that you have made an asterisk with 12 arms.

Step 5: Flip over the asterisk, and use a gold metallic marker to write something special about each member of your family on a strip of the pumpkin. If you have a small family, you can write two special things about each person. Don’t forget to include yourself!

Step 6: Flip over the asterisk again. Now everything you wrote should be face-down so that you can’t see it anymore.
Step 7: Beginning with the final strip you attached, place glue on the end of the strip and attach it to the opposite end of the same strip. Continue this process of gluing the end of each strip to the center of the pumpkin.

Step 8: Use brown cardstock (or construction paper) to draw a stem. Cut out the stem and fold under the bottom of the stem to create a base. Glue the base of the stem to the pumpkin.

Step 9: Use green cardstock (or construction paper) to draw a leaf. Cut out the leaf and fold under the bottom of the leaf to create a base. Glue the leaf to the top of the pumpkin.

Place your finished pumpkin centerpiece in the middle of your dining table, on your fireplace mantle, the dresser in your room, or anywhere you’d like. We think this pumpkin centerpiece is the perfect fall decoration, and we hope you enjoy making it just as much as we did!