Craft Alert! Air Dry Clay Kindness Dish How-To
AUGUST 16TH, 2022

Trinket dishes are popular items to make with air dry clay, and rightfully so. They’re simple to create, and it’s fun to feel the clay between your fingers. Here’s a heads-up, though: this is not your average trinket dish. Kindness is the theme of this craft! You’ll be using your trinket dish as a place to keep ideas for random acts of kindness you can do to help lift other girls up.

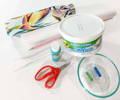
Supplies for the Dish
- Air dry clay
- Small bowl
- Acrylic paint
- Water
- Craft knife or butter knife
- Rolling pin (round bottle or jar works too)
- Parchment paper
- Pencil
- Glitter
- Scissors
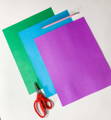
Supplies for Hearts
- Colored paper
- Pencil
- Scissors
How to Make Your Trinket Dish
Step 1: Put a large chunk of clay on parchment paper.

Step 2: Add several drops of paint to the clay and knead the clay to spread the paint throughout. Repeat this until the clay has your desired color.

Step 3: Place parchment paper over the clay, and use a rolling pin to flatten the clay to about ¼ of an inch. We used a water bottle instead of a rolling pin.

Step 4: Press a small bowl into the clay, and use a craft knife or butter knife to cut around the bowl. Use scissors to trim away any remaining excess.

Step 5: Knead the excess clay, and then flatten it. Add more paint (if you’d like). Put parchment paper over the clay and smooth it out with a rolling pin.

Step 6: Add glitter to the clay. Then roll the clay into a thin worm-like shape. Put this long shape around the edge of your clay circle.

Step 7: Add more glitter to the rim of the trinket dish.

Step 8: Use water to smooth the edges, and ensure the two separate parts are well connected.

Step 9: Use a pencil to make small dots that spell a message about kindness, like “be kind.” Allow the dish to dry for 2-3 days.

Step 10: Use paper and scissors to make 4 small hearts. On each heart, write a different way that you can lift up another girl you know by showing kindness. Here are a few ideas:
- Draw a picture for a friend
- Play with someone who’s alone
- Pick a flower for a friend
- Bring an extra snack for a friend

Put your kindness trinket dish in a place where you’ll see it every day. Then place your hearts in your kindness dish, and choose a heart once a week for a reminder of how you can spread kindness in your community.

We think this is a great way to start a new school year, but can be a lot of fun at any time. We hope you have a blast doing this project!